











Need to number a long Adobe InDesign document without fixing every page by hand?
The right way is to place an automatic page number marker on a Parent page, then apply that Parent to your document pages.
Adobe InDesign will update the numbers whenever pages are added, removed, or rearranged.
In this step-by-step guide, you’ll learn how to add automatic page numbers in InDesign, start numbering on a different page, and hide numbers on covers or other specific pages.
What Is a Parent Page in InDesign?
Before jumping into the steps, it helps to understand what a Parent page actually does.
Think of it as a reusable template for your document pages.
Anything you add to it, including page numbers, headers, footers, guides, background elements, and other recurring details, can appear automatically on every page that uses that Parent.
The idea is simple: set it up once, then let Adobe InDesign do the repetitive work.
That is what makes Parent pages so useful for numbering.
You’re not typing “1,” “2,” or “3” onto individual pages, but adding a marker that tells InDesign to display the correct number wherever it appears.
How to Add Page Numbers in InDesign: 7 Key Steps
Follow these seven steps to add automatic page numbers that stay accurate as your document changes:
Step 1: Open the Pages Panel
Go to Window > Pages to open the Pages panel.

This panel is split into two sections:
- Parent pages appear at the top.
- Document pages appear below.
In most new documents, the default Parent is called A-Parent.
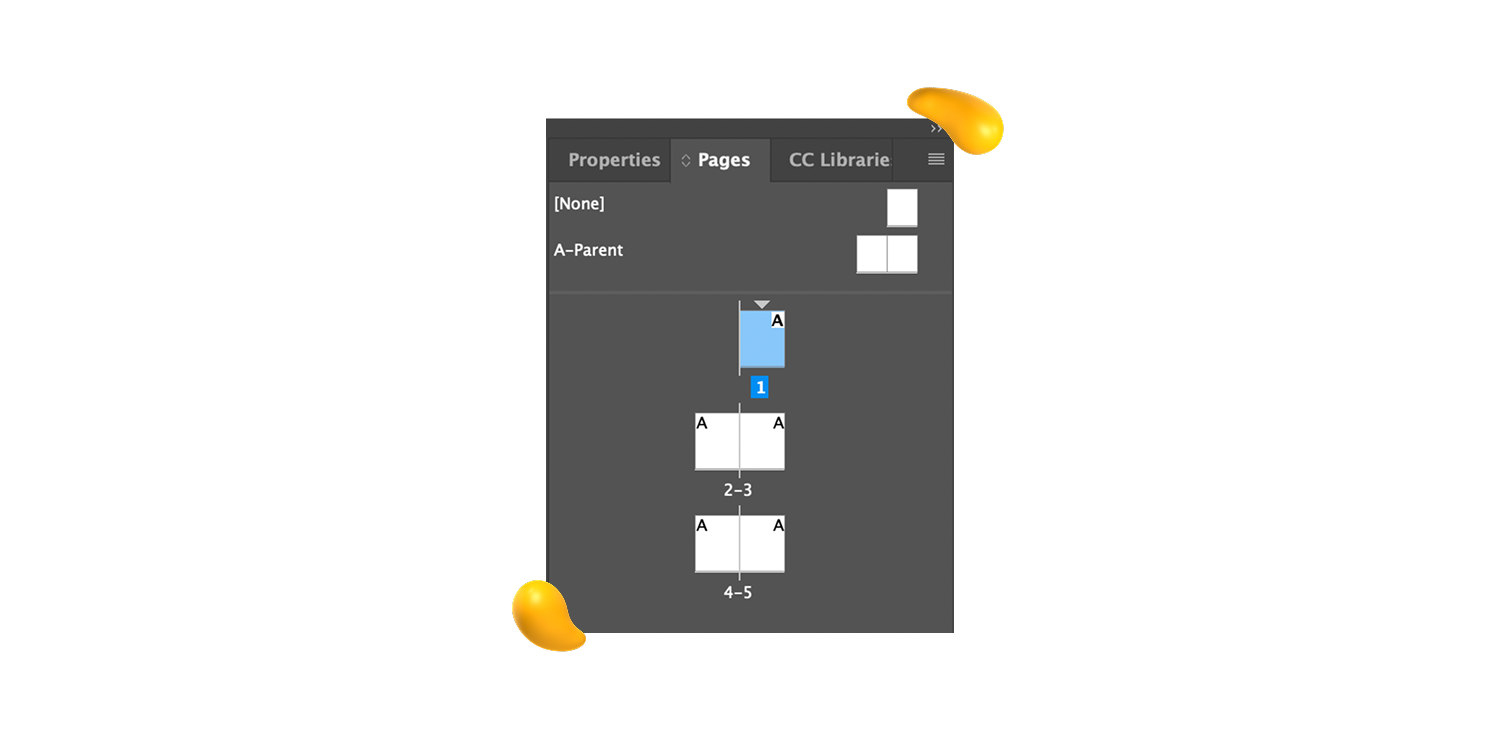
If your document uses facing pages, A-Parent will appear as a left-and-right spread.
This is important if you want page numbers in the outside corners of a book, magazine, or other multipage layout.
You’ll need to add the page number marker to both sides of the Parent spread so it appears correctly on left and right pages.
Step 2: Double-Click the Parent Page
In the Pages panel, double-click the Parent page where you want the page number to appear.
For most simple documents, this will be A-Parent.
You are now editing a reusable layout, not a single document page. Any element you add here can appear across every page that uses this Parent.
That is one of the biggest advantages of working in Adobe InDesign.
Instead of placing and adjusting the same element page by page, you create the layout rule once and let the document reuse it.

Step 3: Create a Text Frame for the Page Number
Select the Type Tool, then draw a text frame where you want the page number to appear.

Place the frame based on the type of document you are designing.
For example:
- Use a centered footer for a clean ebook.
- Place it near the outer edge for a book or magazine.
- Pair it with a section title or divider line in a proposal.
Make the frame wide enough to fit the longest page number in the document.
A frame that works for page 9 may cut off page 109, which is the kind of small problem that tends to appear right before export.
Step 4: Insert the Current Page Number Marker
Click inside the text frame you created. Then go to Type > Insert Special Character > Markers > Current Page Number.

InDesign will place an automatic page number marker inside the frame. If you are working on A-Parent, you will see the letter A instead of a number.
That’s normal.
The Parent page displays its prefix, while the document pages display their actual page numbers.
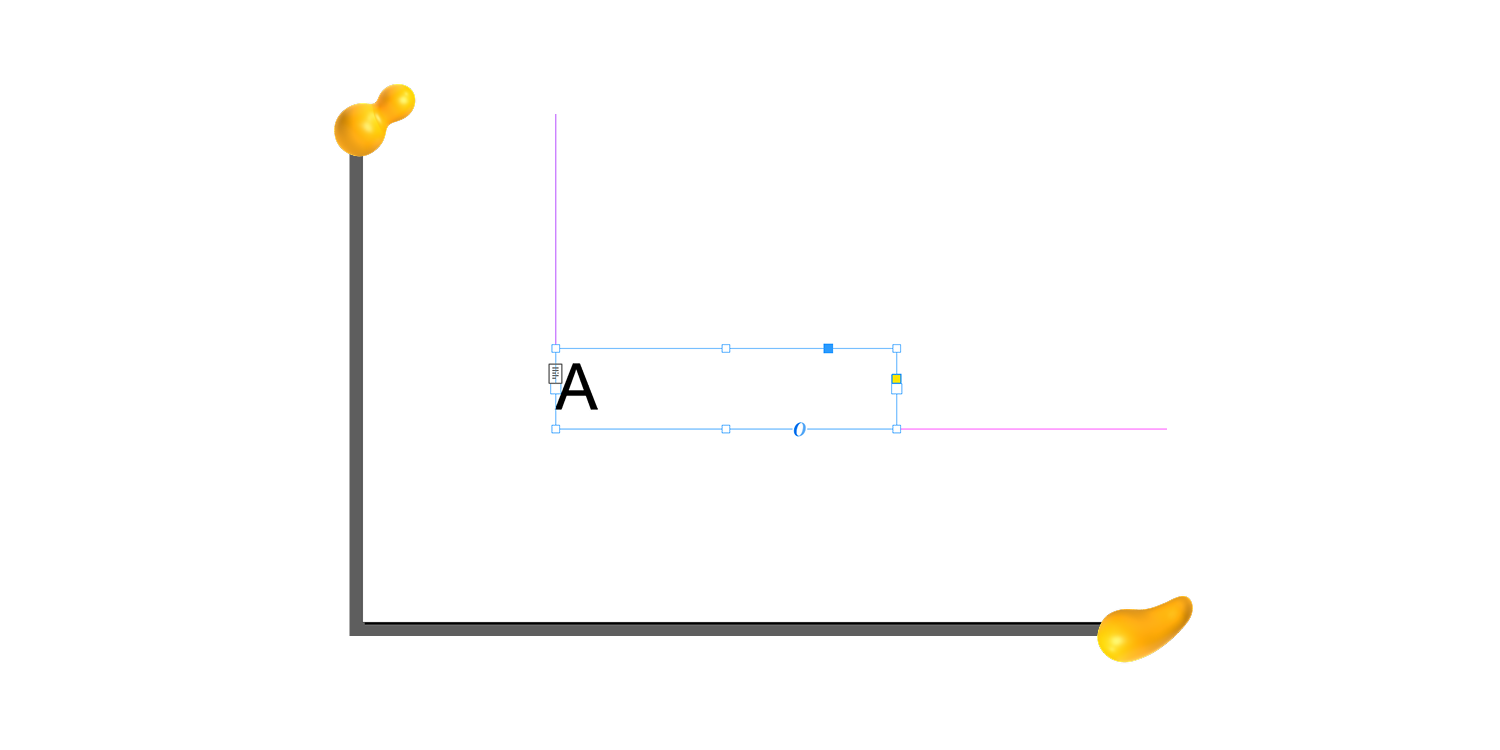
To confirm the setup is working, return to one of your document pages. As long as A-Parent is applied, the correct page number should appear in the text frame.
Step 5: Style the Page Number
Style the page number marker to match the rest of your document.
Adjust the font, size, color, alignment, and spacing until it feels like part of the layout rather than an afterthought.
For longer documents: Create a dedicated paragraph style for your page numbers.
If you later want to change the size, weight, color, or alignment, you can update the style once and apply the change everywhere.
Step 6: Add Page Numbers to Both Sides of a Spread
If your document uses facing pages, add the page number marker to both the left and right pages of the Parent spread.

Start by copying the text frame you already created and pasting it onto the opposite page. The Current Page Number marker will update automatically.
Then adjust the position and alignment of each frame.
Page numbers typically sit near the outer edges of the spread, so the left page may use left alignment while the right page uses right alignment.
Step 7: Apply the Parent Page to Your Document Pages
First, check whether A-Parent is already applied to your document pages. If it is, the page numbers should appear automatically.
If not, choose one of these methods:
- For a single page or spread: Drag the A-Parent thumbnail from the top of the Pages panel onto the page or spread.
- For multiple pages: Select the pages in the Pages panel, right-click, and choose Apply Parent to Pages. Select the correct Parent, confirm the page range, and click OK.
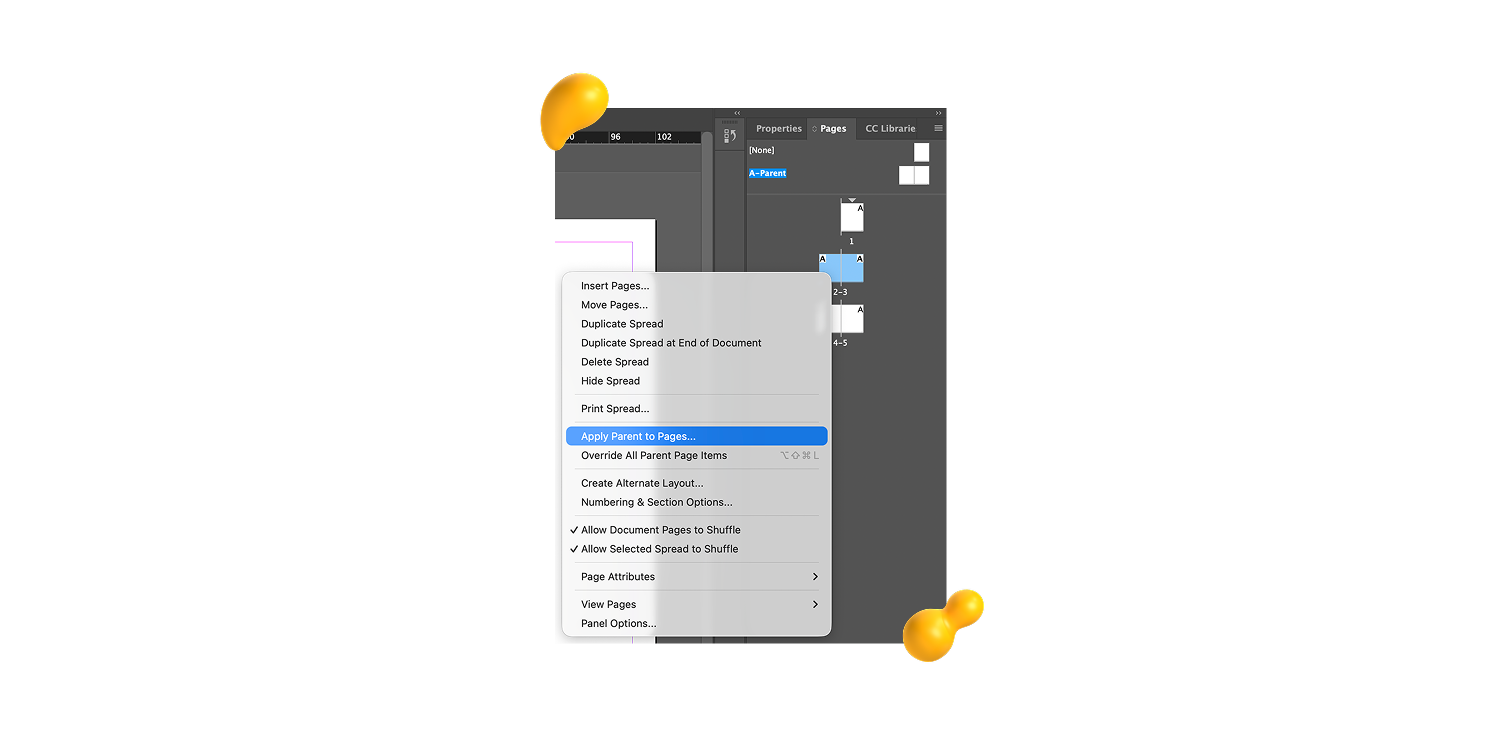
Once the Parent is applied, each page should display the correct number.
Quick check: Add a page in the middle of the document or move an existing page. If everything is set up correctly, the page numbers will update automatically.
How to Start Page Numbering on a Different Page in InDesign
Not every document should display page 1 on the cover.
You may have a title page, table of contents, introduction, or section opener before the main content begins.
To start numbering later, select the page where you want the new section to begin. Then go to Layout > Numbering & Section Options.
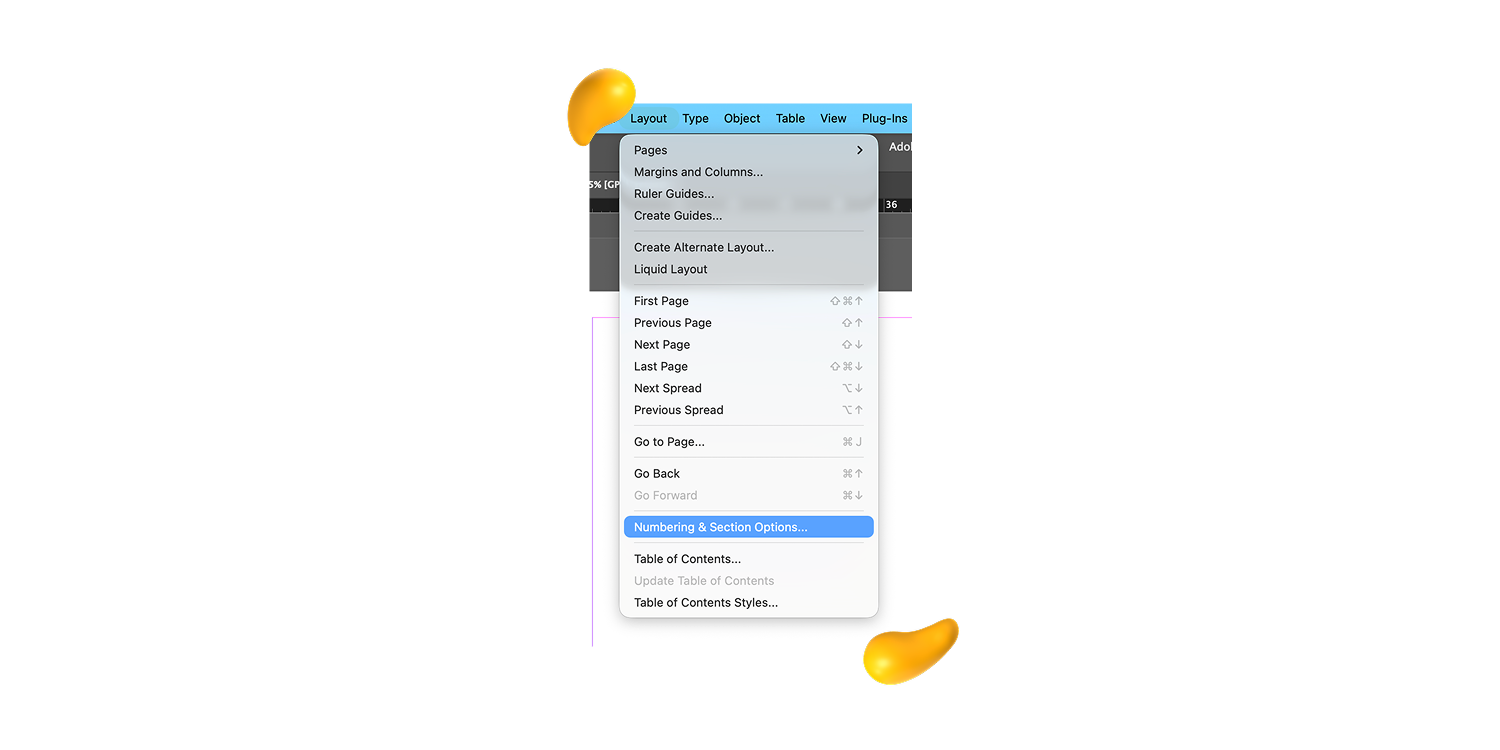
This lets you control where the visible numbering starts without changing the actual order of pages in your Adobe InDesign file.
In the dialog box, select Start Section, enter the number you want to begin with, and choose your preferred numbering style.
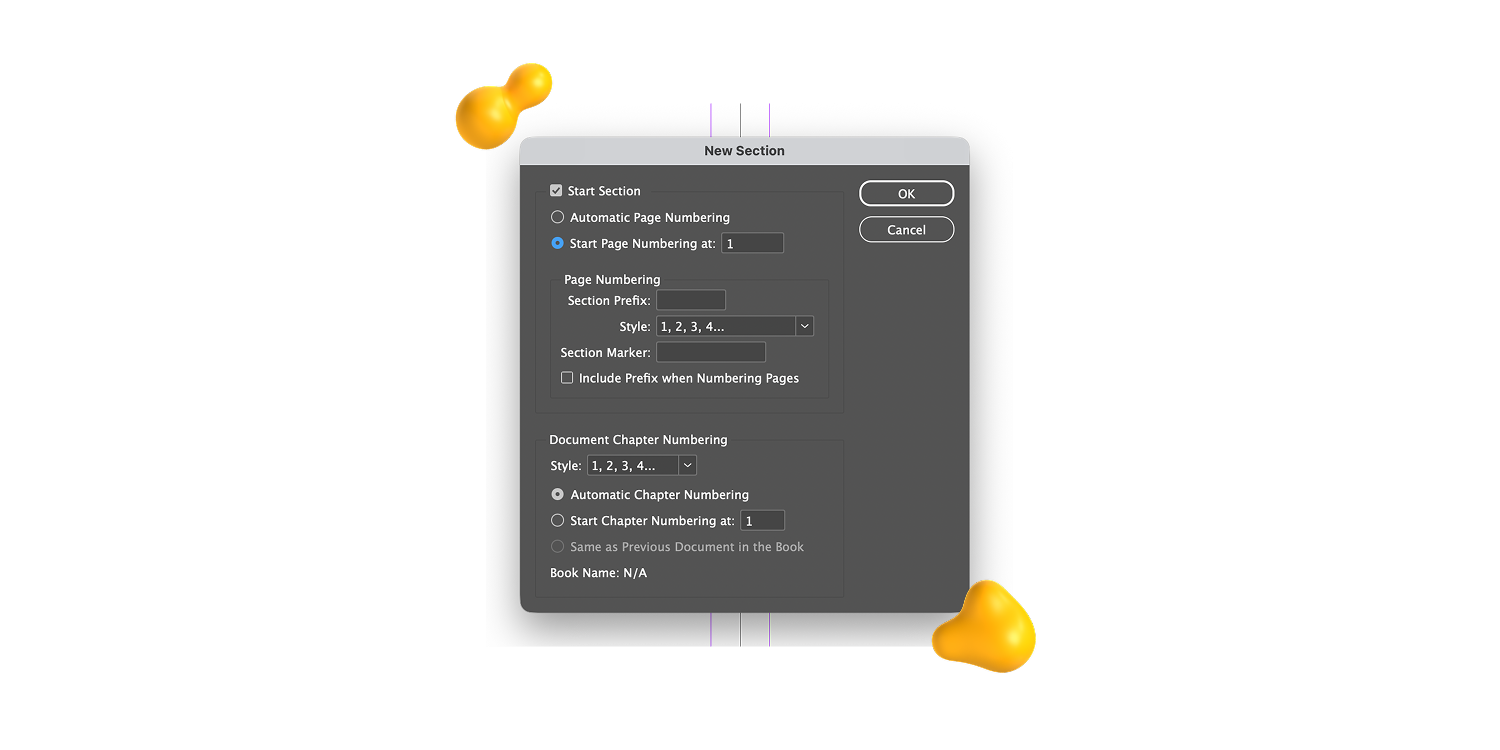
For example, your first chapter can display page 1 even if it’s technically the fifth page in the file.
You can also use Roman numerals for the front matter, then switch to standard numbers when the main content begins.
The key thing to remember is that page order and visible page numbers don’t have to match.
Your cover can stay unnumbered, your table of contents can use a different style, and each new section can start exactly where it needs to.
InDesign keeps the structure organized, so you do not have to wrestle the numbering into place.
How to Hide Page Numbers on Specific Pages in InDesign
Some pages simply don’t need a number. Covers, chapter openers, and full-page image spreads often look cleaner without one.
The best approach is to create a separate Parent page without the page number.
For example, you might use A-Parent for your standard numbered pages and B-Parent for pages that should keep the same layout but leave the number out.
This keeps the file organized and avoids manually deleting or overriding page numbers one page at a time.
You can also apply [None] to a page, but use that option carefully.
It removes every Parent item from the page, including headers, guides, background elements, and other recurring layout details. In other words, you may remove more than you planned.
How to Create “Page X of Y” in InDesign
For PDFs, reports, and other downloadable documents, a footer like “Page 3 of 24” can help readers see where they are and how much is left.
Start by inserting the Current Page Number marker. Type of after it, then go to Type > Text Variables > Insert Variable > Last Page Number.
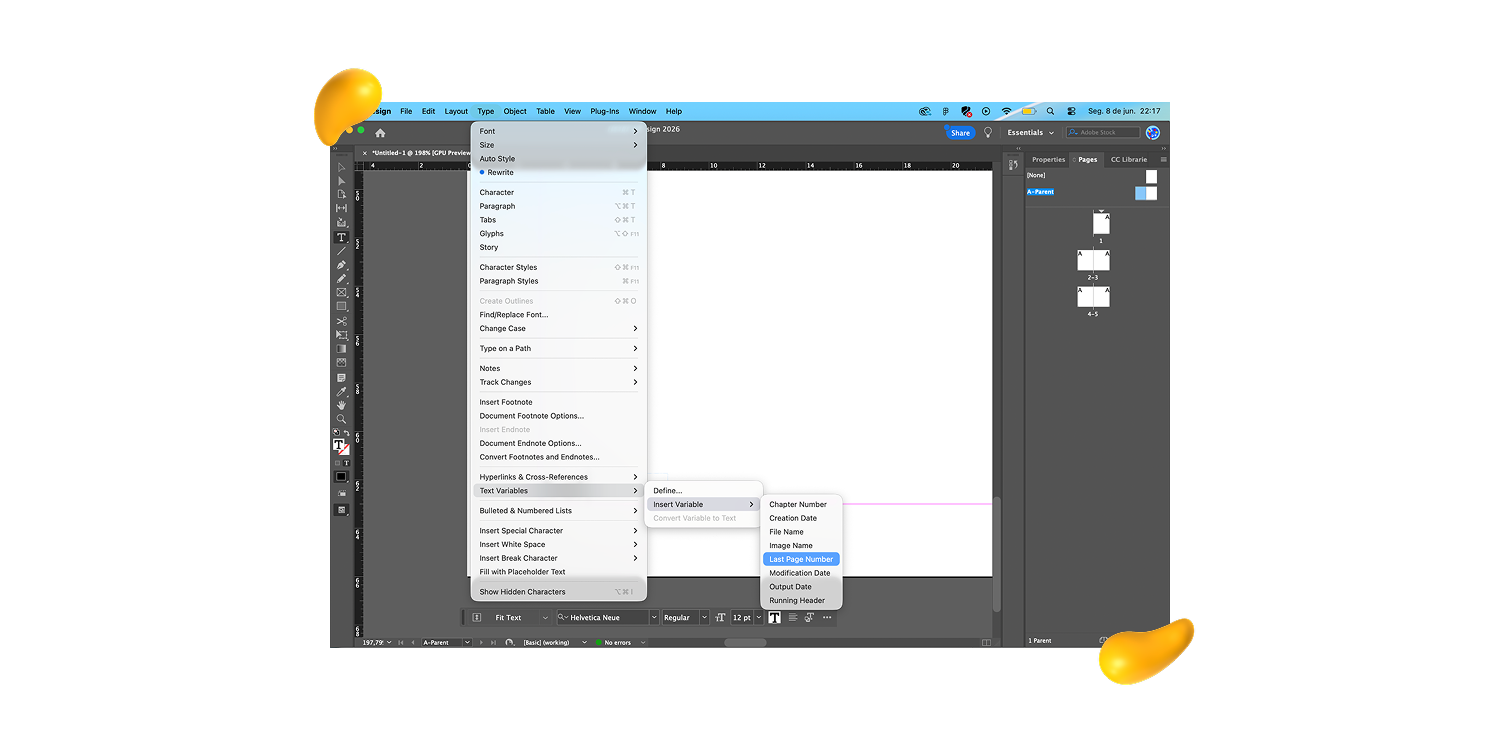
Your Parent page may show markers instead of the finished numbers. Check a regular document page to see how the footer will actually appear.
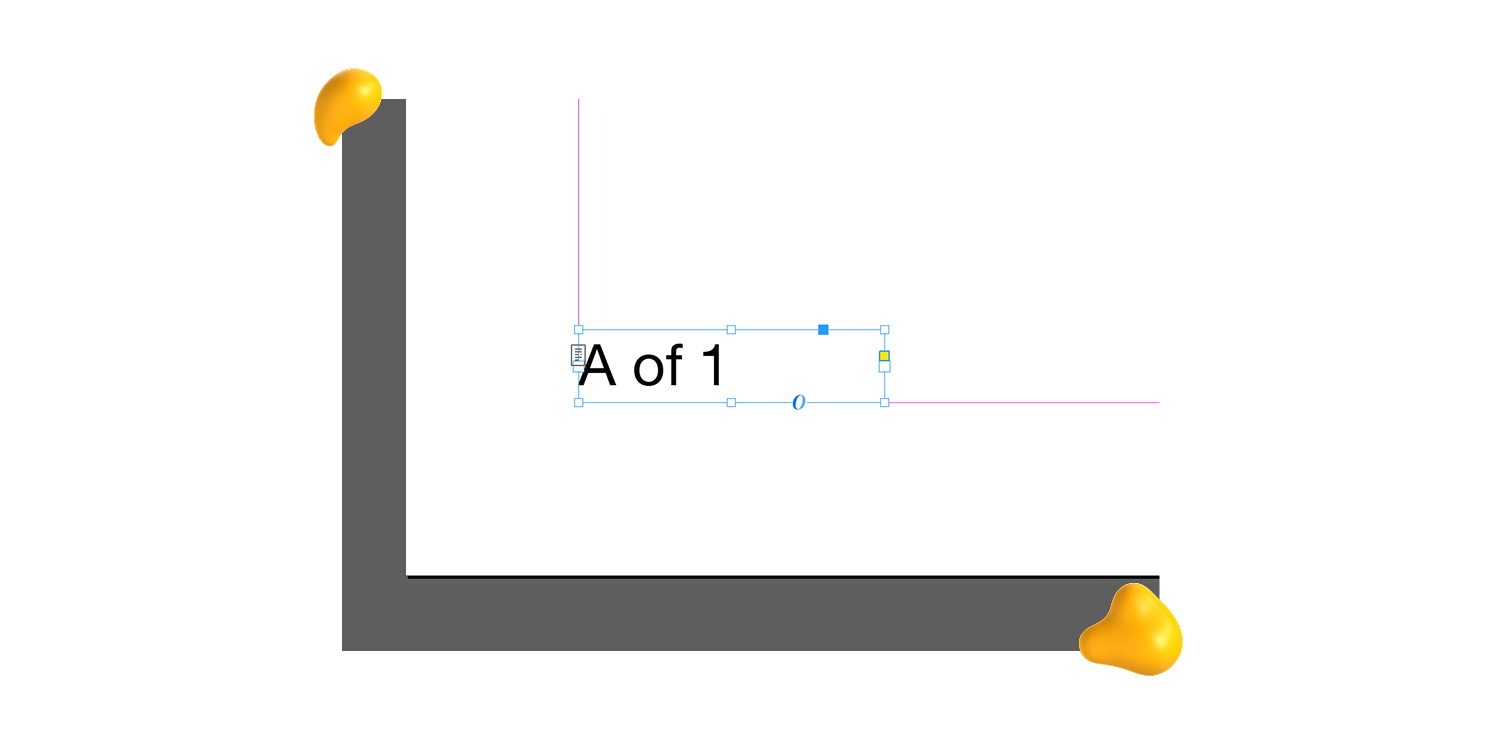
This format is useful, but not universal. It works well for reports, presentations, and practical PDFs. For books or magazines, it can feel a little too functional, so use it when it genuinely helps the reader.
4 Common InDesign Page Numbering Problems and How to Fix Them
Most page numbering issues in InDesign come down to a few small setup details.
Before rebuilding anything, check these common culprits:
- The page number is missing: Make sure the correct Parent page is applied. You may have set up the number perfectly on A-Parent, only to find that the document page is using a different Parent or [None].
- The number only appears on one side: Go back to the Parent spread and confirm that you added the page number marker to both the left and right pages.
- The numbers are out of order: Check your section settings and make sure a new section has not restarted the numbering unexpectedly.
- The numbers stop updating: Avoid typing page numbers manually. The moment pages are added, removed, or rearranged, those numbers become one more thing to fix by hand.
{{drowning-in-projects-an}}
InDesign Page Numbers Sorted. Your Next Chapter Starts at Designity.
Learning how to add page numbers in InDesign is about more than placing numbers in a footer.
It shows that you know how to build a layout system that stays organized, consistent, and flexible as a document grows.
That kind of thinking matters at Designity.
You’ll work remotely alongside top global creatives, with guidance from experienced Creative Directors, on projects spanning branding, web, campaigns, motion, and more.
You focus on thoughtful creative work.
No chasing clients. No awkward invoice follow-ups. No wondering where the next brief will come from.
You’ll also explore how AI can support faster, smarter workflows while keeping human creativity, judgment, and craft firmly in the driver’s seat.
Ready to put your InDesign skills to work on bigger creative challenges?